Introduction
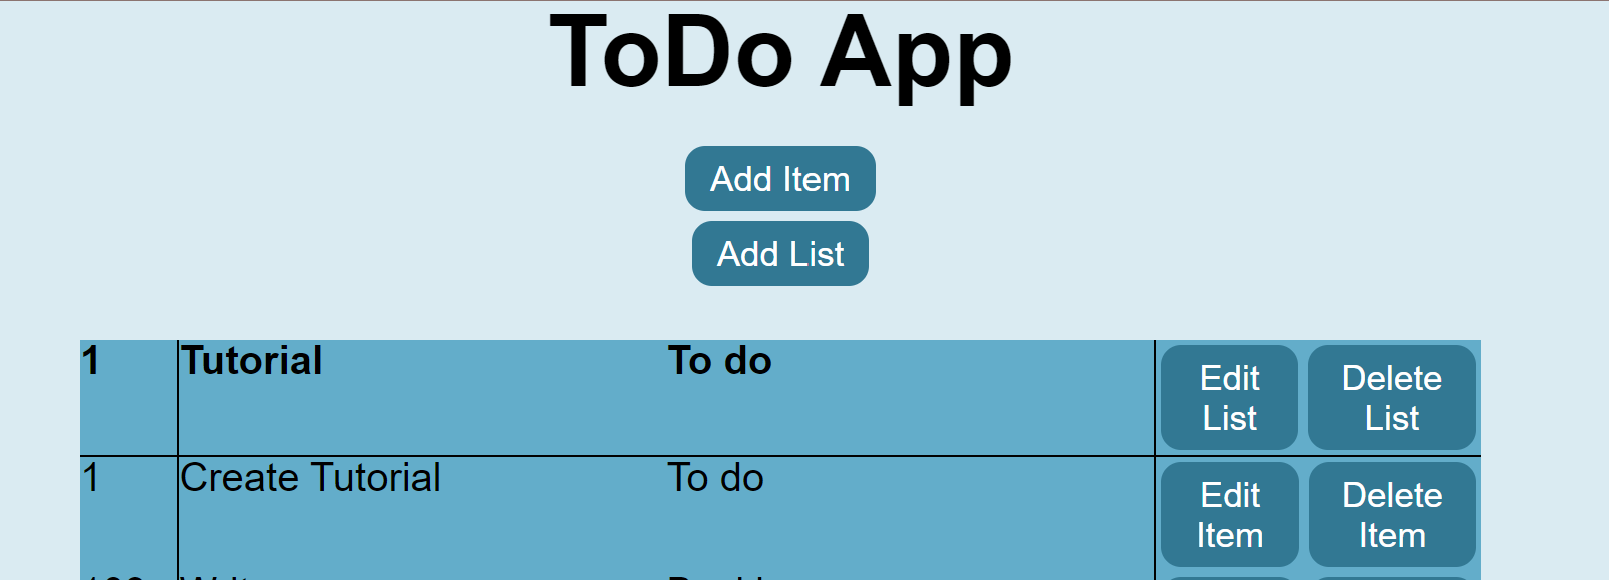
This instructional guide employs a tech stack comprising Python, Flask, Jinja2, HTML, JavaScript, and a SQL database to architect a ToDo application, as illustrated below:

The tutorial provides comprehensive instructions for either cloning the project from our Devii GitHub repository or constructing the application from scratch.
This project is for demonstration purposes only it is not secure nor is it a complete app and should be run in your local environment only.
Devii Registration and Login
Initiate the process by registering and logging into the Devii portal. Refer to the register and login, for detailed instructions. If you already possess a Devii account, you may skip this step.
Python Installation Verification
Before proceeding, confirm the presence of Python on your system.
-
Windows:
- Open the command prompt and type
python --versionorpython -Vif you have python installed you will receive a response “Python 3.x.x”, the 3.x.x represents the python version you have installed.
- Open the command prompt and type
-
macOS and Linux:
-
If you have a mac, open the Terminal app by going to the Applications folder or Spotlight search and searching for Terminal, type
python3 --versionorpython3 -Vif python is installed you will see a response “Python 3.x.x”, the 3.x.x represents the python version you have installed. -
Why do you need to use 'python3' in MacOS and Linux?
- On many MacOS and Linux distributions python refers to python2 and is installed by default, to use python3 it must be referenced as python3 as not break anything that rely's on the fact that python refers to python2
-
Installing Python (if not installed)
In case Python is not installed, visit https://www.python.org/ and follow the provided instructions to download and install the suitable version for your operating system.
Create PostgreSQL database
A SQL database will need to be set up for this project, Neon.Tech, has a free tier that works well for this project, you can follow their documentation to set up a project here. After you have your project set up, you will need to create a database (e.g. "todo") and two tables: List and Item. Below I have included the SQL code to create both tables used in the tutorial.
Neon.tech will automatically convert all input text to lowercase, regardless of how you capitalize it. This means that whether you enter text in uppercase, lowercase, or a mix of both, it will internally convert everything to lowercase.
CREATE TABLE Status_Value (
    statusID SERIAL NOT NULL PRIMARY KEY,
    statusName varchar(255)
);
The Status table will provide a list of available statuses for the application, the List and Item table will have 'Backlog' as a default value.
CREATE TABLE devii_users(
    userid SERIAL NOT NULL PRIMARY KEY,
    name VARCHAR(255),
    email VARCHAR(255),
    devii_roleid INT UNIQUE
);
The devii_users table will hold the unique values assigned and add their devii roleid to the table.
CREATE TABLE List (
ListID SERIAL NOT NULL PRIMARY KEY,
ListName varchar(255) NOT NULL,
StatusId INT,
CONSTRAINT FK_ListStatusID
  FOREIGN KEY (StatusID)
  REFERENCES Status_Value(StatusID)
devii_roleid INT,
CONSTRAINT FK_devii_roleid
  FOREIGN KEY (devii_roleid)
  REFERENCES devii_users(devii_roleid)
);
CREATE TABLE Item (
ItemID SERIAL NOT NULL PRIMARY KEY,
ItemName varchar(255) NOT NULL,
StatusId INT,
CONSTRAINT FK_ItemStatusID
  FOREIGN KEY (StatusID)
  REFERENCES Status_Value(StatusID)
ListID INT,
CONSTRAINT FK_ListID
  FOREIGN KEY (ListID)
  REFERENCES List(ListID)
  ON DELETE CASCADE
devii_roleid INT,
CONSTRAINT FK_devii_roleid
  FOREIGN KEY (devii_roleid)
  REFERENCES devii_users(devii_roleid)
);
When a user signs up, a roleid and other sign-up information are created in Devii, with the roleid being stored as devii_roleid in the devii_users table, along with the other sign-up details, except for the password. While the devii_roleid currently has no function, future updates will implement it for access control via Devii's Policy Based Access Control, allowing users to view only the lists and items they have created. For now, devii_roleid remains inactive.
For testing purposes, I added elements in all tables except devii_users.
INSERT INTO status_value(statusName)
  VALUES
    ('Backlog'),
    ('To do'),
    ('Done')
INSERT INTO List (listname, statusid)
VALUES ('Tutorial', 1)
INSERT INTO item (itemname, listid, statusid)
VALUES ('Create Tutorial', 1, 1)
Devii Connection Setup
Create a Devii connection to your database. Refer to database connection instructions. Extract necessary information from your Neon Tech project dashboard (username, password, database name, hostname). The connection string format is:
psql 'postgresql://username:password@hostname/database_name?sslmode=require'
Optional: Devii Connection Verification
To check your connection, execute the following query in the Devii portal using the GraphiQL interface:
{
  list {
    listid
    listname
    status_value {
      statusid
      statusname
    }
    item_collection {
      itemid
      itemname
      statusid
    }
  }
}
You should receive a reply of:
{
  "data": {
    "list": [
      {
        "item_collection": [
          {
            "itemid": "1",
            "itemname": "Create Tutorial",
            "statusid": 1
          }
        ],
        "listid": "1",
        "listname": "Tutorial",
        "status_value": {
          "statusid": "1",
          "statusname": "Backlog"
        }
      }
    ]
  }
}
With the Devii connection established, proceed to construct the application. The complete code for the ToDo app is available in the Devii GitHub repository. Clone the repository for experimentation or create the code from scratch using your preferred Integrated Development Environment (IDE). If you opt for VS Code, refer to VS Code Installation Tutorial for guidance.